
The Digital Statement Part II
Scanning for Preservation
May 2022
by Camille Blot-Wellens, Caroline Fournier, Tiago Ganhāo, Anne Gant, Rodrigo Mercês, Davide Pozzi, Céline Ruivo, Ulrich Ruedel, Kieron Webb, members of the FIAF Technical Commission.
Introduction
Part II of the Digital Statement explores the decisions, questions, and problems around image scanning, specifically regarding preservation scans. These are scans that attempt to accurately capture the most information from a film element. They are ideally taken from the most original source, for example an original camera negative or best surviving print. The resulting scans are usually quite large, and often require extra work after scanning before they are useable (for instance, for projection). This distinguishes them from access scans, which are usually created to be immediately useful for viewing, and may be a smaller size, more often taken from an already graded print. It is critical to note that scanning with the goal of preservation is a very specific type of scanning. Many archives scan for access, which can create a satisfactory result for contemporary use, and conserves digital storage cost and space. FIAF documents on choosing film scanners, as well as DSI, have information that is helpful for scanner selection and setup, and digitization for access. The FIAF Technical Commission (TC) wants to remind all readers that a scan with the goal of preserving the image information does not replace a well-protected and conserved film element. It is critical that archives keep the film. Also, please note that in this section, “scanning” refers to image scanning. Sound scanning is addressed in Part IV of the Digital Statement.
Part II does not address issues of digital preservation (see DS V), or the non-technical issues, e.g. historical and critical understanding of film, which are essential to preservation or reconstruction of an image/film (these issues have informed DS III). These aspects are crucial for a healthy and complete film preservation practice.
This section of the Digital Statement covers some dense technical topics, which the TC has attempted to summarize clearly and concisely, and which are still open for investigation and discussion, perhaps even consolidation or correction. Also, as with many digital developments, the landscape is changing quickly, and the TC welcomes critical re-evaluation of this document and constructive suggestions or specific corrections by our colleagues in the field.
Part II consists of the following sections:
- Film Sources, Selection of Material
- Overscanning
- Setup of the Scanner: Density
- Setup of the Scanner: Resolution
- Rebuilding the Image: What is a “raw” scan?
- Photographic Grain and Graininess
- Questions about Aliasing
- Conclusion: Keep the Originals!
1. Film Sources, Selection of Material
In order to better understand the way film scanners capture and process images, the Technical Commission interviewed many leading scanner manufacturers. One of the questions each was asked was, “Is a scan a clone of the original?” The scanner manufacturers, while their technological approaches differed widely, agreed on this question: A scan is not a clone of the original photochemical image. In some cases, the scan can come close to capturing the original, but that depends on many factors, including the suitability of the scanner to the specific element being scanned, the quality of the material being scanned, and the skill of the operator. While it is acknowledged in photochemical duplication that the duplicate misses some details that were visible in the earlier element, it is similarly the TC’s advice to consider that a scan is also not a clone of the original film. Don’t discard the film element once you can have scanned it — always keep the film elements as well.
In making decisions about how to scan, it is important to know the purpose of the digitization. If a scan is for access, it may make more sense to choose a quicker and less complex workflow — for instance, choosing elements in good condition, which are already graded, or choosing a scanner which handles positive material well. If a scan is for preservation, it may make sense to try to use the best generation, to make a higher- resolution scan, and to create a scan that requires post-scanning work, like grading or digital restoration.
Depending on the condition of the elements that are going to be scanned and the film stock, archives need to identify the most appropriate machine to digitize their elements. Considerations include the level of deterioration or damage, film format, and negative, positive, colour, or black & white nature of images. This will ensure that there won’t be any further damage done to the film, and that the best possible capture of information will occur, avoiding as much as possible a loss of information (See the Scanner Forum on the FIAF website and also the Digital Statement Part I, about the different types of scan sensors). If possible, some short tests on different machines can be helpful to compare the quality of scanned images, including use of diffuse light or wet gate for scratch suppression.
Once the elements have been chosen or while they are being chosen, a condition report should be created before any repairs or digitizing. Archives need to define a clear goal — preservation or access — before digitization. This means that the supervisor overseeing digitization needs to define a clear digital workflow, including the different outputs that are going to be created. The second step of the workflow creates the “raw” scans, which are the files directly from the scanner, uncompressed, recommended to be done at the minimum of 2K or 4K and 10-bit log. (*NB: The term “raw” is used in different ways, and can lead to some confusion. In this case we are using “raw” to mean the output of the scanner that is the closest version of the original material, with no active interventions applied to image and sound. The scanner itself, while translating physical material to digital information, is already making approximations, based on the settings and capabilities of the scanner, so “raw” is an inaccurate term.)
It is recommended that archives keep these first-capture “raw” files, so that the digital restoration process can be reversible (at least to this first digital capture moment), in case something happens further down in the digital workflow process, or decisions change over time.
2. Overscanning
Most archives that have answered the FIAF survey in the Digital Statement Part V are using the overscan setting when scanning the material. “Overscan” is a full-aperture scan which records the camera gate, frame line, and the inner part of the film edges. This setting helps to preserve as much information as possible about the camera gate characteristics. It is also very useful when stabilizing the images later with restoration software.
This “extra” information can be of value, as it captures historical information about the material. The original camera gate or printer gate, and duplication or deterioration marks that are captured, can assist in making better processing decisions. If film frames are slightly unstable or uneven, it also gives a margin of error in the capture area, which can help later in reassembling the digital image. Some scanners, mostly prototypes, include “edge-to-edge overscan”. This means that the entire edges of the film (perforations and manufacturer data) are digitized as well. For silent films, other information, such as shot numbers or handwritten annotations, are on the edges. This kind of data can be crucial when reconstructing a film.
Scanning the full edge of the material is not yet a common practice in the archive world. However, the edge information is very valuable for preservation. If it is not captured during digitization, then it can be done either by photochemical preservation of the film, or it should be documented thorough documentation such as classical inspection and /or photographic documentation. Alternately, a second scan for different characteristics— a low-res documentation scan, for instance, could be a considered.
If a film is overscanned, the number of pixels being used to capture the image area of the film will be diminished, as some of the pixels are being used to capture the edges. So, for instance, a 4K edge-to-edge capture may only have 3600 available pixels for a silent film image. When possible, film should be overscanned on a scanner that has a resolution of approximately 4300 x 3956, to ensure that the image area will still be in 4K after processing the image to the correct aspect ratio.
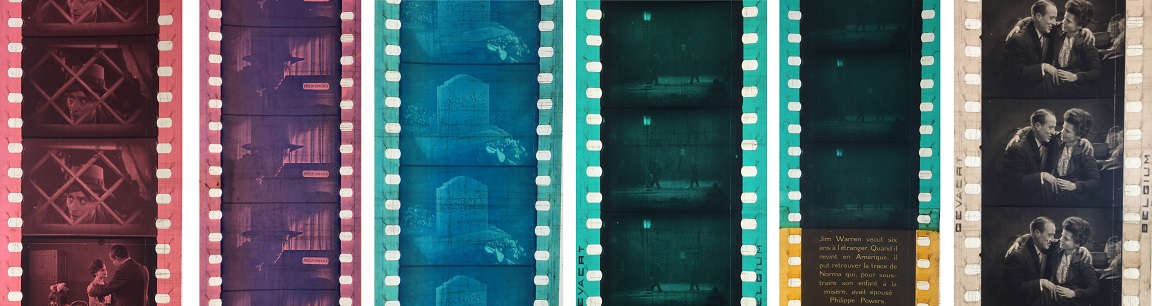
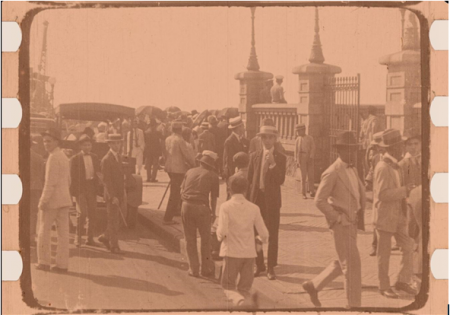 Example of an overscan frame: Chegada do hydro avião Jahú ao Rio de Janeiro (1927), tinted nitrate print scanned on Arriscan. ©Cinemateca Brasileira, São Paulo, Brazil

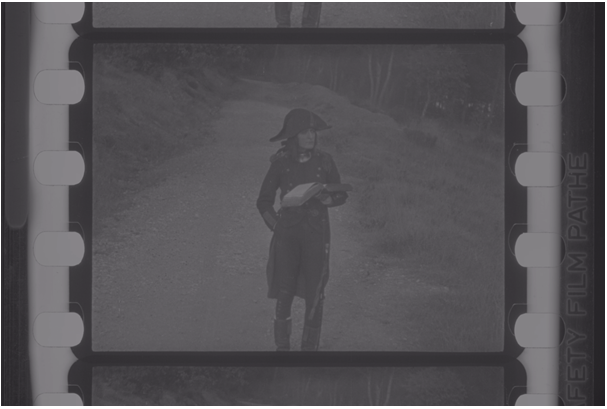
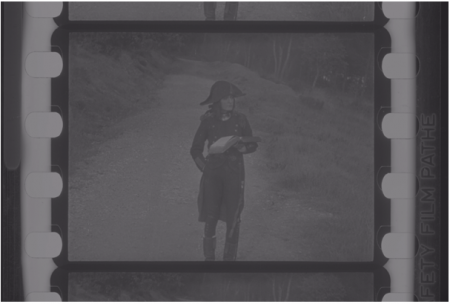 Example of a full overscan with visible edges: Napoléon (Abel Gance, 1927), Safety diacetate Pathé, 4K scan on Nitroscan, Eclair laboratory. ©La Cinémathèque française, Paris
3. Setup of the Scanner: Density
The settings of the scanner must be made in relation to the goal and the established workflow. If an archive wishes to scan for preservation, the decision is usually to set the minimum density on the scan (Dmin) to get a higher colour reproduction, close to the original film characteristics. This implies that the images will come up with a very large grey scale, inappropriate for viewing but suitable and flexible for colour grading, printing back to film, and/or the production of digital presentation copies like DCPs in further digital processing.
When scanning for preservation, many archives follow the Cineon workflow developed by Kodak, where the base density is placed at 10% above black and the density of the film is mapped to bit values in a linear manner by a lookup table, or LUT. In Cineon 10-bit, every .002nd (neutral density) change in density of the film equals 1 number change in density of the file, resulting in a total range of .002 nd multiplied by 1023=2.046 nd, which covers the range of most colour negatives. This captures more range than was displayed in the original release print, which gives the archive room to grade the material.
A display LUT can then be used to emulate the look of a negative printed to a photographic positive. This is a way in the digital realm to get as close as possible to recreating the original look of the film in projection. Because this workflow was developed in the 1990s as a commercial workflow, and not as a preservation workflow, it works best for colour negatives and materials such as colour reversals and positives. B&W negatives and positives, and hand-painted and tinted materials, and even some color negatives, fall outside its range.
There are possibilities to capture a wider range of densities, and it will be important to review this document in the future, with further results. A contemporary possibility is the Academy ACES format, which has not been widely adopted in archival workflows yet, but which can represent densities to 8.0 ND. There are also ways to adapt the Cineon format for archival scanning, such as changing the ND represented by each change in 10-bit values — for example, if you make each step represent .004 ND, to double the density range covered. However, as this is outside the standard documentation, the archive will need to carefully document the workflow, possibly by editing the dpx image header.
In any case, before scanning it is important to review all the settings of the scanner with a critical eye to the result and a good understanding of the characteristics of the material being scanned.
4. Setup of the Scanner: Resolution
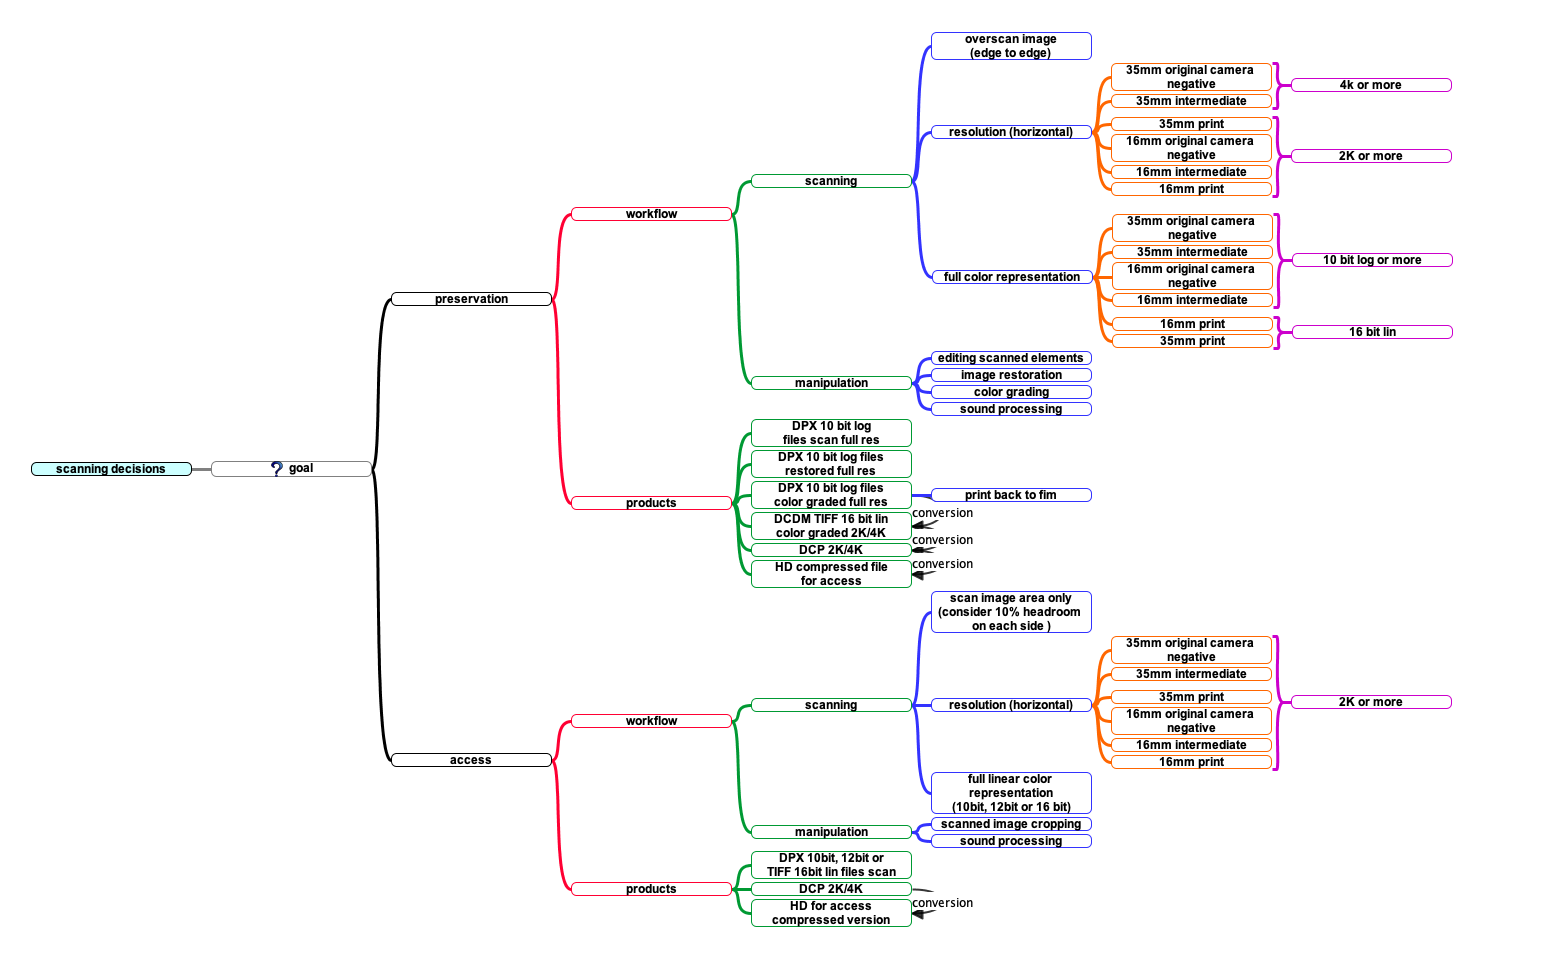
The “raw scan” resolution can either be defined with the aim of capturing the full image information of, for example, the original camera negative for preservation (around 4K or more for the horizontal image), or, as seen in some archives’ workflows (Results of the survey regarding digital practices at FIAF archives) it can be set to correspond to the resolution of a presentation print (around 2K for the horizontal image).
There are multiple decision paths in a digital workflow, with various results.
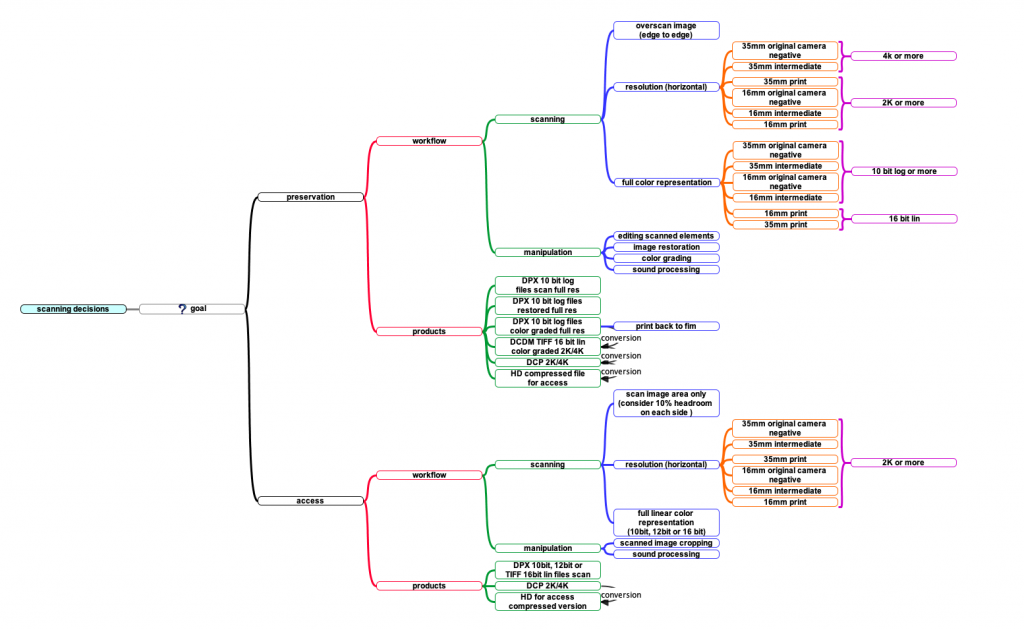 Workflow diagram provided by Rodrigo Mercés, Cinemateca Brasileira, São Paulo, 2020.
4K is theoretically not enough.
There seems to be a consensus among restorers and manufacturers that 4K is not enough to mathematically capture all the information that exists in a 35mm OCN frame. It is also known that the duplication process of photochemical preservation increases generations and decreases the quality of the image. Because of this, later generations, such as dupe positives, dupe negatives, or prints, have less detail to capture, so it is generally accepted that 4K digitization is suitable for most elements.
The number of pixels is only one of many factors determining the quality of the captured data. It is important to realize that other scanner characteristics also play key roles in the final definition that is achieved: the lens choice (optical definition and glare), illumination (collimated or diffused), digital sensor (type, construction, noise), film transport (intermittent or continuous), or wet-gate/dry scanner, are all relevant to the quality of the final digitized image. See FIAF’s Digital Statement Part I and “Choosing a Film Scanner” for more discussion about scanner types and characteristics.
If the archive wishes to better capture information such as original film grain, dust or damage for archival documentation, then much-higher resolutions are necessary. Some archives and labs scan at 6K, 8K, or more, and then make their access products at 4K or 2K, which is sufficient for contemporary playback and is visually acceptable.
10/12-bit log choice?
The question of bit depth is another factor in determining the quality of the captured data, and is as important as the number of pixels or scanner capabilities. The amount of bit depth needed to effectively represent the film is a question that the TC attempted to explain in simple terms. Even though, as pointed out in “Setup of the Scanner: Density”, 10-bit is generally enough, it is important to understand some terms and variables that can have a direct impact on this decision, particularly when not scanning "standard" colour negatives.
When defining the bit depth in which a film element should be scanned for preservation purposes, one must first consider the amount of information available in the original element, and then how it can best be represented in the digital realm. From light to film density and then digital representation, light/colour information goes through some transformations and different units of measure. If we take the colour negative example, one can say that 10 stops of light from the real world are represented in 6 stops of density in the negative film. Each stop in both these cases means double the intensity (light intensity or film density), despite the unit of measure. Most of the available commercial scanners work with a 12-bit sensor. This means that once the negative is exposed to light in the scanner, the sensor can differentiate 4096 values. When saved in a 10-bit file format, these colour negative density variations would be mapped and fit inside the 1024 available code values of the file. In short, the mapping of the densities in a “regular” colour negative to a 10-bit log .DPX file is just sufficient to represent the film in the digital realm and in a transfer back to film workflow. There is even some room for colour grading the scanned image.
The problem occurs when the range of the densities in the film is not what should be expected from a “regular” colour negative, both for higher and lower values.
For example, with an element with a higher density range, like a Kodachrome reversal film, the “standard” 12-bit sensor reading would not be able to capture the full range of stops in the original image, not to mention the constraints of the 10-bit file. Clipping the information that goes beyond the expected range will result in a wrong representation of the image, and therefore is not acceptable for preservation purposes. While it is still not yet possible to rely on higher dynamic-range sensors, there is a technique that is available in scanners or post-processing that takes advantage of exposing the same image twice, one for the higher and one for the lower densities, and then combining them together. The values of this new higher-range image can then be mapped to a 16-bit file to ensure that no light/colour information will be neglected. Along with the costs of doubling the exposures per frame and increasing the processing of the images, the resulting 16-bit file will also take up 50% more storage space then a 10-bit one. It is also possible to squeeze all this extra information into a 10-bit file, but the cost to make it a more accurate conversion is high and the results are usually not ideal.
The same principles can be applied to a faded colour negative, where the range between the lowest and the highest density is smaller. One way to manage this, while trying to take advantage of the entire sensor range, is to ensure that all the information captured is mapped to a wider range of values, unlike the pre-defined relation between “regular” colour negative film densities and digital values.
Despite all the technical advances in scanners and increasingly precise sensitivity, we believe it is important to remember that in analog film exposure, the analog chromogenic film contains layers of different light and colour sensitivity, and silver halide grains of different size. Scanners work in another way: the sensors used to capture the images need to be operated with different settings or differing illumination, so that they are detecting the ranges of visible spectrum and optical density. This remains an idealized scenario: large density ranges may still be hard to capture on typical current sensors, and the low signals on the image sensor may be affected by the inherent image noise generated by the scanning process, rather than only by the image itself. Some devices may choose to eliminate noise by clipping, thereby presenting an image unaffected by noise and perhaps preferable to the untrained eye, but losing details in the dark areas. Differences in the spectral properties of colourants in film materials, including effects of fading, stain from dye decomposition, and typical side absorption of many chromogenic dyes, may not be captured, with individual colour(s) missing from scans of stencil-coloured nitrate, for instance. Thus, even in the best scenario, the scanned image as a “clone” of the analog frame may still be substantially out of reach, a shortcoming that needs to be put in perspective, considering inevitable losses and changes in analog duplication.
5. Rebuilding the Image: What is a “raw” scan?
Effectively, all scanners need some reassembly of the image. While an analog chromogenic film may contain layers of different light and colour sensitivities, and silver halide grains of different size, and thus “film speed”, image sensors are “colour-blind” by nature, and need to be operated at different settings and with differing illumination or filters to capture different ranges of the visible spectrum and optical density.
In area-based sensor scanners, the image is exposed to the “colour-blind” sensor in serial exposures in the different primary colours (RGB), to capture all colours and densities. Disregarding the limits of colour/density depth (see “10/12-bit log choice”, above), reassembly of these images should not be a challenge, since they should be perfectly aligned. This is achieved by holding the frame stationary until capture is complete, and then moving to the next frame.
In case of any misalignment of the image during the exposure due to micro-movements of the film, usually associated with the use of film gates without pin-registration (pin-less tension-based transport, or wet-gates), the resulting scanned image could be digitally corrected by the realignment of the already separated colour channels present in the file.
In general, scanners with this kind of sensor tend to be more expensive. Another disadvantage of this workflow is the relatively slow scanning time due to the intermittent transport.
At the other end of the performance scale are scanners using area colour chips. As discussed before, in “Choosing a Film Scanner”/DS I, capture is fast, through the simultaneous sensing of the three primary colours with a single exposure. This is achieved by dividing the sensing sites of a single area sensor between them using a colour filter array, such as the Bayer pattern (filter mosaic). Compared to the same image captured at the same resolution with an area-based sensor, only a third of the data needed for full colour and resolution capture is obtained.
Such data thus need processing through algorithms to reconstruct the missing spatial/colour information – effectively, the missing two-thirds of an image with full RGB resolution needs to be reconstructed based on assumptions of the nature of the original image information eluded during capture. Due to the possibility of using different algorithms for this “de-Bayering” or “de-mosaicing” now and in the future, it is wise to save scans before de-Bayering.
In the middle of the performance scale, in terms of complexity of image reassembly, line-sensor scanners offer the ability to capture full colour and extended exposure information. These sensors can work in two ways: either the line-sensor moves over the film, which is held in a stable position, or the film passes over the sensor. Any mechanical issue in the film transport can directly affect line reassembly, which can lead, for instance, to “wiggly” horizontal lines visible to the trained eye, or, in the case of “splice bumps”, very noticeable image distortions in otherwise high-quality full-colour resolution scans. Some setups may help to solve these issues through monitoring the mechanical transport and activating some form of digital de-warping. This can be done during the scanning process, but correcting a digital artefact created by scanning is obviously not ideal. Another issue in some line-sensors, those using beam splitters to facilitate separation of R, G, and B capture, are potential misalignments in the beam splitter, causing colour registration issues.
Each scanner has its pros and cons. No scanner is perfect for all material. It is important to remember that all scanners are rebuilding the image with some assumptions, algorithms, and decisions made internally. The “raw scan” is not so “raw” as we might imagine. The data is affected by the setup of the scanner, the settings that the operator has chosen, and the way that the machine rebuilds the image.
6. Photographic Grain and Graininess
An understanding of how “motion picture film grain” can, or should, be rendered in digitization would first require a discussion of what “grain” is to begin with, and how it is rooted in the materiality of photographic film. This, however, is a complex issue beyond the scope of this statement, with only a summary offered here.
Basically, according to Kodak digital expert John F. Hamilton, in his 1972 article “The Photographic Grain” (Applied Optics, vol.11 n°1 (1972), pp. 13‒21), the term “grain” can have three distinct meanings. The first, denoting the light-sensitive crystal grains of silver halide in undeveloped films, shall not concern us here, as a mere chemical precursor of the grains in developed films. These grains are tiny particles of metallic silver (typically and microscopically, of filamentary rather than compact particulate nature) distributed through the photographic emulsion. However, these individual photographic grains are much too small to be seen by the naked eye, even upon enlargement in projection. However, collectively, through their size, shape, and distribution (both lateral and through the – finite – depth of the emulsion), they not only form the photographic image with its varying densities, but indeed also the unique textures of still and moving images. These are also denoted as ”photographic grain”, in what is effectively a third meaning of “grain”, describing a visual perception more aptly called “graininess”.
Note that processed chromogenic colour film material no longer contains any image silver, but rather consists of dye clouds formed around the developed silver grains before their chemical removal. Thus, the nature of “grain(iness)” also applies to the dye-cloud image in such colour films.
A digital image is not comprised of individual “black” metal grains of varying sizes in different, microscopically random positions, but rather of a set of pixels arranged in a geometric pattern stationary from frame to frame, which can take different grey or colour values. Thus, while unable to “forensically” resolve the shape and distribution of these small grains due to their microscopic size and distribution, digital images should be able to approximate the resulting and visible density fluctuations of the photographic image, which produce both its image and its “grainy” texture.
Lastly, the nature of the opto-mechanical film projection process also combines with the nature of photographic grain to result in a “moving” film grain texture. The projected moving image is formed through a succession of individually projected photographic images, interrupted in analog projection through the action of a projector shutter, resulting in acharacteristic and dynamic “film grain”. To what extent a digital image can reproduce the film grain in both its spatial and temporal characteristics remains an open question (and, furthermore, may be heavily subject to compression, if any), and very well may or may not be one reason for the “digital” look of pixel-based, shutter-free digital projection.
7. Questions about Aliasing
As explained above, the structure of analog/photochemical motion picture film is very distinct from digital, and so is the way that we perceive it. The look of a Digital Cinema Package (DCP) and a photochemical print are the end result of two different workflows. With born-digital films, the DCP is the object expected to be screened, and as long as it is approved, it should raise little ethical concern for film archivists and restorers. The ethical question is more complex when we start from photochemical material and want to restore it using digital technology and present it in a DCP. Even if we start with the main objective of emulating the look of a photochemical print in a DCP, there are some questions about film grain and the way it is rendered in the digital image. Some “boiling” appearance of digitized grain is often observed in Digital Projection, which might be caused by some sort of “aliasing”, either motion aliasing, temporal aliasing, spatial aliasing, or all three. Unfortunately, at this point the TC does not fully understand the effect of “aliasing” in digital cinema. We want to raise this as a point for more in-depth research in our community, and provide some beginning information.
What is “aliasing”?
There are many definitions of “aliasing”, since it is found universally in digital systems, and therefore manifests itself in different fields of knowledge. But we can generally refer to it as an effect produced when a signal is imperfectly reconstructed from the original signal due to insufficient frequency of sampling to create an accurate representation (for instance, Graham Saxby, The Science of Imaging, An Introduction, Bristol and Philadelphia, Institute of Physics Publishing, 2002, p.145; Ron Graham, Digital Imaging, Caithness, Whittes Publishing, 1998, p.47). Aliasing is relevant in fields such as digital audio, digital photography, digital cinematography, analog TV, and computer graphics. It was also studied in Digital Cinema, where it can be seen as any artefact inserted into image data as a result of the interaction of pixels with scene (image) content. According to a 1974 book by John C. Dainty and Rodney Shaw (Image Science: Principles, Analysis and Evaluation of Photographic-Type Imaging Processes, New York, Academic Press Inc., 1974), Image Science, photochemical film as a capture medium does not suffer from aliasing because it is a non-uniform sampling device. In a more recent SMPTE paper (2006), by Gabriel Fielding, Ryan Hsu, Paul Jones, and Christopher DuMont (“Aliasing and Reconstruction Distortion in Digital Intermediates”, SMPTE Motion Imaging Journal, April 2006), the authors state that for film productions which only involve the optical transfer of film from the original negative to the final print projected on the screen, uniform sampling never occurs, so aliasing cannot occur. Aliasing becomes an issue for film only when the colour negatives are scanned using a uniform sampling pattern (as is the case for all current scanners).
Trying to shed some light on this issue, the TC is performing a series of tests to compare a full photochemical chain, where the scene information is minimal, and then digitize it in several commercial scanners. The purpose of these tests is to better understand the degradation of grain structure when is duplicated from an OCN to a Dupe Positive to a Dupe Negative to a final print, and how scanners interact with the content in this chain, and capture and interpret the different grain structures. Despite the fact that we could identify some differences when visualizing a split-screen between the photochemical elements and their digital representation, it was difficult to determine all the causes which contribute to this difference. We suspect that some sort of “aliasing” exists, but also that reconstruction errors of the image, DCP compression, and the nature of the opto-mechanical projection can add important variables (see above) to the equation.
It is nevertheless important to understand and be aware of aliasing, because all conditions are present for this effect to appear when any photochemical film element is digitized. Regardless of the definition of grain that you might consider (see above), pixel size in the sensors currently used in the industry are still too big to correctly sample the finest grain texture. Another SMPTE paper, published in 2003 (Roger R. A. Morton, Michelle A. Maurer, and Christopher DuMont, “An Introduction to Aliasing and Sharpening in Motion Picture Systems”, SMPTE Motion Imaging Journal, May/June 2003), explains how aliasing can cause distraction to viewers, since motion aliasing can produce surprising lines and colours that “dance”, “twist”, and “shimmy” across the scene. Perceptually, this can be serious, because the human visual system is alerted by motion.
Apart from the distraction introduced by digital artefacts when watching a DCP, it is also of key importance to highlight the difference between aliasing (a product of digital uniform sampling) and grain (a product of film construction), since it has become very common to hear the words “grain” or “digital grain” when seeing a DCP that uses a digitized photochemical material as source. This language appropriation can be misleading, since it helps to validate the idea that a digital workflow complies with 1.4 of the FIAF Code of Ethics which states that archives will not edit or distort the nature of the work being copied and new preservation copies shall become accurate replicas of the source materials, implying that the “aliasing” that we see in a DCP is the grain that always existed in the photochemical source material, and not an artefact introduced with Digital Cinema.
Generally speaking, the Nyquist theorem dictates that twice the highest frequency of a source material's relevant information that is to be digitally captured is needed as sampling rate. If higher frequency information is present in the source material, it will cause aliasing. To prevent this, an anti-aliasing filter could be applied on the original analogue signal to remove this high frequency information before sampling. Also, the sampling rate, (which, in imaging, means the resolution), should be as high as possible to limit the possibility of generating aliasing artifacts.
8. Conclusion: Keep the Originals!
If Digital Cinema, or even photochemical duplication, complies to 1.4 of the FIAF Code of Ethics is a question open to debate, one which the FIAF TC strongly encourages in the film community. Issues such as (grain) aliasing, reconstruction errors, the intermittent nature ofopto-mechanical projections, and the shortcomings of image sensors and algorithms employed, may remain obstacles to the perfect reproduction of a photographic moving image.
Since archives and laboratories have begun using digital techniques, the definitions of the restoration and safeguarding of film heritage have changed dramatically. Even analog restorations which were considered definitive decades ago are now being re-evaluated. Digital technologies have profoundly modified the methodology of preservation and restoration, and photochemical duplication is no longer a mandatory step in film restoration.
Within a decade, the same film materials may have been digitized several times, with the best technology available at the moment (HD, 2K, 8K, and many others), to capture the most information and assure its compatibility with the projection or delivery systems developed by the Industry. It is now commonly accepted that it may be necessary to repeat the work in the near future, as Fumiko Tsuneishi (Filmarchiv Austria) states: “The currently flourishing digital restoration technology is greatly enhancing the opportunity to start new restorations of film classics from scratch.” (“Pragmatic Solutions for Problematic Sources”, in Kerstin Parth, Oliver Hanley, Thomas Ballhausen (eds.), Works in Progress. Digital Film Restoration Within Archives, Vienna, Synema, 2013, p. 57).
Reversibility is one of the fundamental concepts of preservation and restoration. This requires that archives keep the film materials and limit direct interventions, in order to maintain the condition of the materials in a stable state. The intention is that future archivists will have access not only to the best material possible, but also to the information contained on the element which is often outside the frame of the image (film stocks, edge codes, and annotations for editing or tinting/toning, among others); information rarely kept during the contemporary scanning process (as mentioned earlier, most scanners do not include the totality of the edges; it is important to say that this information was not always kept using analog technologies either). The knowledge and understanding of film (history, technology, completeness) will continue to change and evolve. “Lost” film elements will continue to arrive in archives and private collections around the world. One of the most emblematic examples of films undergoing several restorations and multiple discoveries is probably Metropolis (Fritz Lang, 1927). This film was first restored between 1968 and 1972 by the Staatliches Filmarchiv der DDR, followed by a restoration by Enno Patalas of Filmmuseum München in 1986‒1987 motivated by new discoveries (notably the music score). In 1998, original materials located in several international archives led the Friedrich-Wilhelm-Murnau-Stiftung to commission Martin Koerber to establish a new version, which was presented in 2001. Then a 16mm print was discovered at the Museo del Cine Pablo C. Ducrós Hicken in Buenos Aires in 2008, which led to a new restoration, presented in 2010. Another film that was the object of successive restorations was L’Atalante (Jean Vigo, 1934), restored in 1940, 1990, and 2001. (See Bernard Eisenschitz, “Les Atalantes, le retour. À propos de plusieurs restaurations d’un film”, in Béatrice. de Pastre, Catherine Rossi-Batôt, eds., Arts Plastiques et Cinéma. Dialogue autour de la restauration, Grenoble, De l'Incidence, 2016, pp. 26‒37). Keeping the original film elements allows restorers to repeat work and have the opportunity of creating a new version, not only more complete, but perhaps more coherent.
As Julia Wallmüller (Deutsche Kinemathek) has stated: “History shows that restoration methods that were accepted during a certain period were subsequently criticized and abolished by the following generation. These ever-changing standards concerning the way cultural heritage should be treated have made reversibility of any restoration activity one of the most important principles of restoration theory. It implies the possibility of unrestricted recovery of an object’s state before intervention.” (“Criteria for the Use of Digital Technology in Moving Image Restoration”, The Moving Image, vol. 7, n°1, 2007, p. 81).
To conclude, preserving digital cinema is radically different from preserving photochemical cinema. As Per Legelius (Svenska Filminstitutet) has pointed out, “the carrier does not have the same significance that a film negative has; with a digitized version we consider only the content, not the carrier.” (Bonatti, Frida, and Per Legelius, "How I Learned to Stop Worrying and Love Digital Archives: Digital Archiving Practices at the Swedish Film Institute", The Moving Image, vol. 19, n°1, 2019, pp.144‒150). In this evolving technological landscape, keeping the original materials is the only way to assure the best version possible with the best technologies available at the moment, and also to have access to all the information contained on film elements, information that may be crucial to analyze the film and improve the work in the future.
The TC thanks the following contributors and reviewers for their feedback on this section of the Digital Statement:
Criss Austin and her team at NARA
FIAF Technical Commission members and correspondents
FIAF Executive Committee
Benedek Kabán, NFI Film Archive
Egbert Koppe
Simon Lund, Cineric
Catherine A. Surowiec
And a special thanks to the scanner manufacturers who took part in our interviews: ARRI, DFT, CTM, Filmlight, MWA, and DigitalVision.


partnership with